This post was last updated on July 24th, 2024 at 09:26 am.
Icon Systems is happy to announce that payroll tax tables are now available in IconCMO church management software. This feature has been one of the most popular features asked for in payroll. We highly recommend reading this entire blog post if you do anything with payroll on IconCMO or forward it to the person that handles the payroll. If you’ve never tried IconCMO you can review a free trial here.
Tax Tables:
Let’s talk about the tax tables. The old system had a lot of flexibility by using a formula to apply to a person’s income for any tax or other withholdings. We kept manual tax calculations as an option in the new screen for users that are more familiar with tax tables and want to customize their tax withholdings via percentage. In the new payroll module, the default is to calculate the amounts using the tax tables. This new enhancement allows churches to use tax tables that are updated automatically.
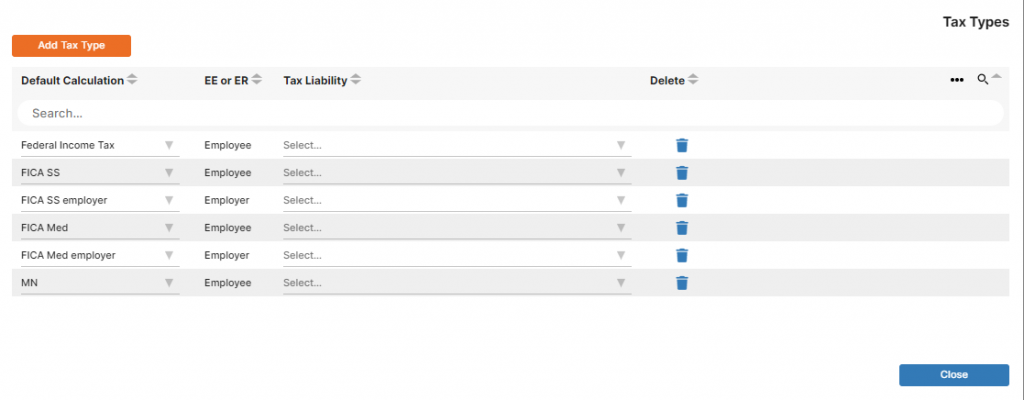
When navigating to Payroll: Payroll Setup, click on the orange Tax Types button at the top of the screen. The system automatically populates the taxes it believes you will need. Default taxes are based on the zip code that was entered under Settings: Information.
There are four main steps to setting up your taxes.
Step 1
If the default does not populate all of the necessary taxes you will need, click the orange ‘Add Tax Types’ button and select the appropriate tax type, whether it’s federal, state or local.
Step 2
Using the dropdown menu, choose the appropriate liability account for each tax type from the chart of accounts. If the appropriate liability account is not listed in the menu, the chart of accounts will need to be updated. This can be done from the dropdown menu. When beginning to type the name of the desired liability account, the dropdown menu will give the option to ‘click to add a new account’.

Step 3
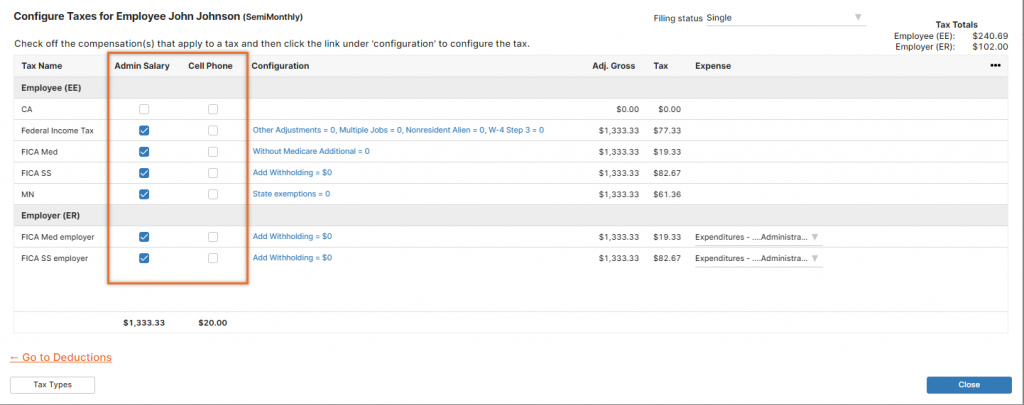
After the employees and their salaries are setup, add the taxes to each employee. The tax screen for a specific employee can be accessed in one of two ways.
1. When going through the setup wizard for an employee, click on the ‘Go To Taxes’ link in the bottom right.
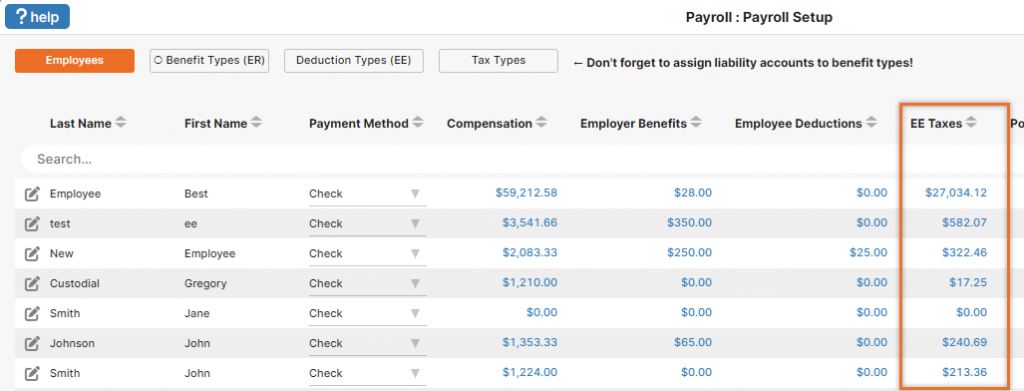
2. It can also be accessed on the Payroll Setup screen by clicking on the dollar value listed under the EE Taxes or ER Taxes columns.
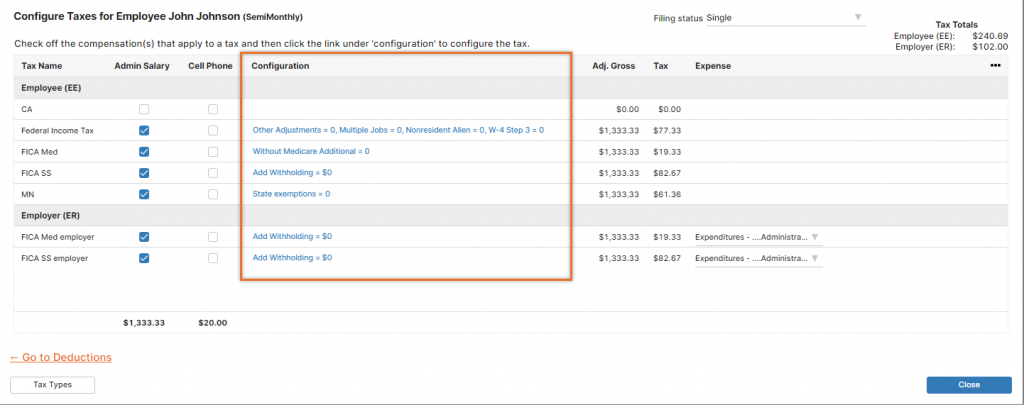
Mark the tax types which apply to each compensation. By default all tax types will be marked for all compensations, however this is not always the case. In the example below, the employee has a cell phone reimbursement. According to this blog by a legal firm, cell phone reimbursements are not taxable income.
Step 4
Configure each tax type per employee. Click on the blue text link in the Configuration column.
This opens the configurations box at the bottom of the screen.

- Check the box for manual tax calculation. This will clear the gray outlined box to only display one field. Enter the income percentage to withhold for that tax type.
- Enter any additional withholding beyond the tax calculations or manual percentage here as a flat amount.
- Mark the box for W-4s completed in 2020 or later. The W-4 was updated for 2020 and therefore the tax calculations changed. Employees with a pre-2020 W-4 will have a different set of fields to complete resulting in a different tax calculation.
- The total amount to be withheld for the specific tax type, based on the selections made.
- The adjusted gross income is displayed and shows how it was determined. AGI is based on the total income minus non taxable deductions. The deductions are determined to be taxable or not based on their W-2 Box 12 value, entered in the Deduction Types screen.
Step 5
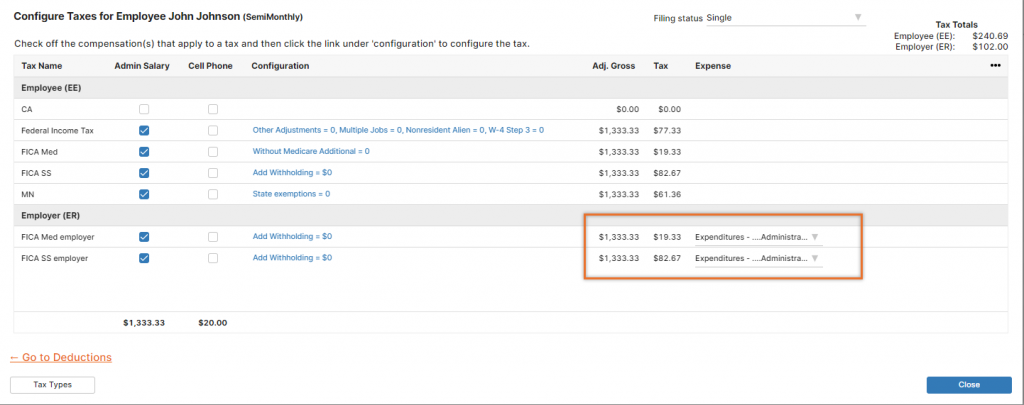
Choose which Expense accounts to pay the Employer taxes from.
Additional Withholdings
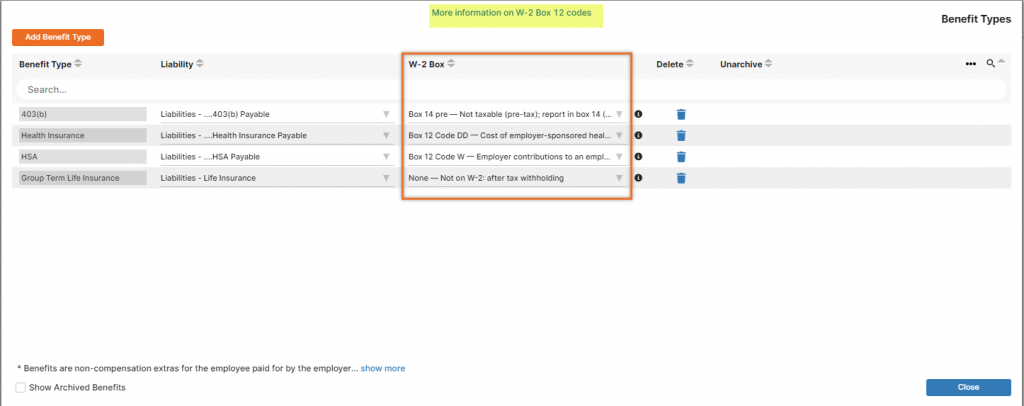
Employees may have deductions that they elect to withhold, or employer benefits that should be included on their paystubs. These are now added in their own respective screens. Similar to the Taxes, you will set up the types that will be available to add to specific employees. Click on the desired button at the top of the Payroll Setup screen.

In addition to liability accounts, the correct W-2 box option needs to be selected for each Employer Benefit and Employee Deduction type. There is a link at the top of the page with information on the W-2 box codes.
Additional payroll information
ACH deposit
Most banks now offer ACH payroll deposit, an online payment solution designed specifically for paying employees. Once enrolled in the service, employee names and bank account information is stored online for easy payments processing. Banks do have a fee associated with this direct deposit service.
Mobile deposit
If you decide to print paper checks, your employees may be able to deposit their checks using their smart phone. Many banks offer mobile deposit to their customers and there is typically no extra charge for this service. This option is secure, easy to use, and convenient. Employees take a photo of the front and back of their check. Using an app on their mobile device they will submit the check to their bank for deposit.
Batch Screen Changes:
We recommend all churches review the batch entry screen before their next payroll for familiarity as it has changed dramatically. The new “batch entry” screen is located under Payroll: Pay Employees.
Click Add New Batch to create your batch. The options available populate from the pay frequencies options selected under the employee’s compensation screen.

Select your pay date, start and end dates for pay range, and enter your batch name. Click ‘Edit Batch’ to open the batch and enter the employees and their hours.

Employees with a pay frequency that matches the batch type will automatically be selected. All other employees are listed for selection to include in the batch.
Choose the payment method of Check or EFT and enter hours for hourly employees. Close the batch when you are finished. Click the Post icon to send the batch to accounting. If you wish to print checks or check stubs for the EFT payrolls, click on the dollar bill icon to produce them in a PDF.
There is still a Batch Edit report that can be viewed before and after posting the checks but is no longer required since the information is all in the working screen.
We hope you enjoy these awesome new features that help the church process payroll and adding new employees easier. And with ACH and mobile deposit the employees don’t have to worry about cashing their checks. 🙂


Does your software help us to withhold and submit payment to the IRS and our respective state?
Board member of Stillwaters Baptist Church in Marietta, Ohio
Daniel Bach
Hi Daniel,
Our payroll software does help you calculate and withhold payroll taxes, benefits and deductions. In our Pay Withholdings window, you can produce a check that can be mailed to the tax agencies. We will be working with our direct deposit partner this year to implement tax payments via EFT!